
You’ve come to the correct spot if you want to learn how to use Facebook Business Manager. We’ve put up a thorough guide to assist you to expand your business while also growing your Facebook account and impact.
While most people have heard of Facebook Business Manager, just few of them really grasp its possibilities. Given how effective Facebook advertising can be for any business, it’s critical to fully grasp the platform and, in particular, the business tools.
So, without further ado, let’s get started and learn everything you need to know about Facebook growth.
Table of Contents
What is Facebook Business Manager, and how does it work?
To fully utilize this social media platform, you must first understand what Facebook Business Manager is and how it operates. The goal of this helpful tool is to give company owners a one-stop shop for all of their needs.
But what exactly does this mean?
As the name implies, the Business Manager is primarily a tool for developing and managing your business. You can write content, advertisements, and manage everything from one location. If necessary, you may also publish, monitor, and report on other company assets such as your pages, advertising, and Instagram.
Furthermore, this application will provide you with complete control over your team, allowing you to assign distinct tasks and responsibilities to each member. This is one of the reasons why this product is gaining popularity and relevance among Facebook Marketing users.
Why should you use Facebook Business Manager?
You may be wondering why tools like this one are so popular, and why you should use them? The answer to this question is not a simple one, because there are so many benefits of using the Facebook Manager.
Here are a few instances of why it’s regarded as one of the greatest tools available, as well as some key features you don’t want to overlook.
Keeps you focused:
The benefit of this tool is that it allows you to separate your personal accounts and focus just on the work portion of your day. Furthermore, you will not accidentally submit something personal, and you will save a lot of time overall.
Other people will only see your company’s information, so you don’t have to worry about privacy.
Organization:
Another advantage of this technology is its structure and security.
From a single Facebook Manager tool, you can schedule content, add members, and track your company’s success rates. There are incredible analytics tools available that will not only assist you with one project but will also educate you on what is providing the greatest outcomes.
This can shape your business objectives in the future and bring better results.
Roles:
With the Facebook business manager, you can easily manage a team of individuals.
You can give different responsibilities to members and regulate how much access they have. Furthermore, if one of the members no longer works for you, you can simply delete them from the list.
Create campaigns:
If you own an agency with numerous customers, you’ll appreciate the ability to handle everything from a single company manager.
You can build advertising for many customers and target various audiences. This will greatly improve your company’s efficiency and enhance engagement rates.
As you can see, there are several advantages of utilizing the sophisticated choices provided by this tool, and it will help with your audience growth, and your advertising campaigns become more efficient.
Who should create a Facebook Business Manager account?
While anyone can set up a Facebook business manager account, it isn’t actually essential for small companies that can handle things without it. However, if your team is expanding, or you run a large agency with a lot of clients, solutions like this one may be more useful.
Here are a few examples to help you determine whether this is the correct tool for you:
- You have a large team and need to give different responsibilities to everyone;
- You operate an agency and work with a variety of clients;
- You have a lot of vendors and need a simple way to keep track of them all;
- As the primary admin, you want complete control over your company.
If these recommendations apply to you and your company, you might be the perfect candidate for the Facebook business manager account.
Keep in mind that configuring this manager is simple, and you will quickly learn how to use it, even if you are a total newbie when it comes to actions for advertising purposes.
How to set up Facebook Business Manager?
Setting up your Facebook business manager can be done in a few simple steps, and you can follow our thorough tutorial to get results in minutes.
As every seasoned business owner knows, a solid marketing plan and organization can make or break a company. This is why you should take platforms with millions of active users seriously and focus on organically growing your Facebook.
Step 1: Create your Business Manager account
To begin using this incredible tool, navigate to the business.Facebook.com website and click the “Create Account” option.
As a result, you will be able to open a business account. Remember that even if you must connect it to your personal account, none of the information will be visible to others.
Step 2: Add business details
Now is the time to personalize your account by entering your company name, email address, and personal name.
After you click “Next,” you’ll be prompted to provide your address, phone number, and other pertinent information.
Then press the “Submit” button.
Step 3: Confirm email
After submitting the initial information, you will receive a confirmation email in which you must click “Confirm Now.” This is a fundamental validation that Facebook requires to avoid fake accounts and fraud.
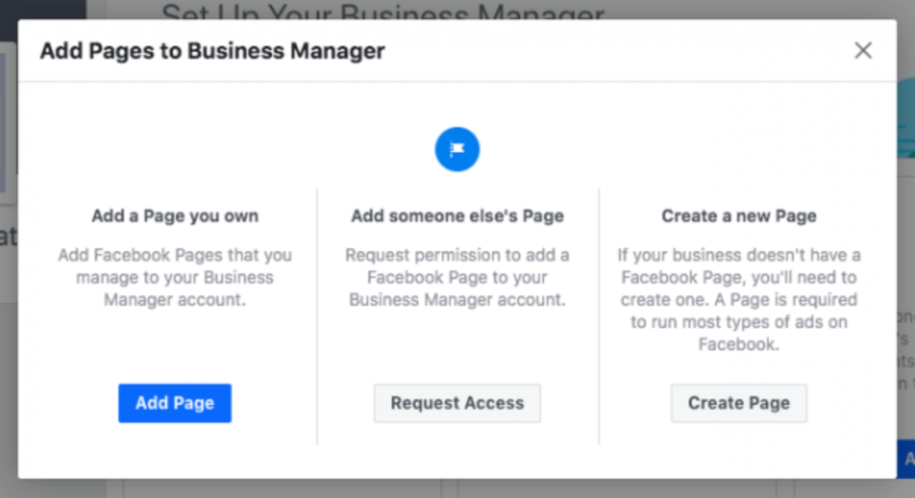
Step 4: Add your business pages
The main point of this manager is to allow you to add and manage company pages from a single location. There is a distinction between adding pages that you own and adding pages from client accounts.
If you wish to manage your pages, just add them to the manager dashboard; however, if you run an agency and need to add pages for your clients, you must request access. This will allow your clients to give you part of their assets, which should help you develop a trusting business connection.
If you wish to add your own pages, do the following:
- Locate and click the “Add Page” option on your company management dashboard;
- You must select “Add Page” once again in the pop-up box.
- Enter the name of your company’s Facebook page and add it;
- It will be added automatically if you have admin access to that page.
- Repeat these instructions for each additional page you need to add.
Step 5: Add your Facebook ad account
This is one of the most essential tasks, so make sure you follow the instructions exactly. Because you can’t remove an ad account from Facebook Business Manager after it’s been added, you must be especially cautious to enter all the information correctly.
You can add your own ad account or request access to your client’s accounts in the same way that you can add business pages.
All you have to do to add the ad account is to click on “Add Ad Account” and input the account ID. This assumes you already have an ad account.
If you don’t have one, here’s a brief tutorial on how to create it:
- Log in to your Facebook Business Manager and select the Add Ad Account option;
- Select Create Account from the pop-up box;
- Enter all of your information, including your name, time zone, currency, and payment methods;
- Create the ad account by selecting the option that states you are the owner.
Having an ad account on a large network like Facebook can be highly useful for both increasing your impact and expanding your business.
Step 6: Add people and assign roles
We said that this tool is fantastic because it allows you to form marketing teams, add members, and provide them access to certain files. When the entire team works together to achieve the same advertising goals, the outcomes are always better.
Finding the “Add People” option on the manager dashboard and entering the business email address of the person you wish to add is straightforward. In the drop-down menu, you can also view advanced options and give assignments to different people.
Remember that you can also personalize the pages that these new members have access to, and when you’re finished, simply click the “Invite” button.
Each member will receive the invitation through email, and the good news is that you can simply delete members or limit employee access at any time.
Step 7: Add Instagram
An experienced company owner will tell you that to be successful, you must be present on all social networks, which is why we recommend integrating your Instagram Shopping and Facebook manager.
It’s extremely simple; just look for the business settings choices in the upper right-hand corner.
Select “Instagram accounts” from the menu and press the “Add” button. This will launch a new pop-up window where you must input your Instagram login details.
How to make the most out of your Facebook Business Manager?
The average business will probably do OK without any tools, but if you want to develop a great campaign and operate a successful company, you should make full use of Facebook’s business manager.
Now that you have thorough instruction on how to set it up, here are a few advanced choices to consider.
Boost security
Facebook has several excellent security features, but you can always add an extra layer of security. Including two-factor authentication will increase your safety and guarantee that access is restricted to the owners of the authentication app and numbers.
Organize business assets into groups
Structuring as well as dividing your assets into separate groups is one of the greatest methods to enhance your Facebook Business Manager and accounts. This will provide you with more control, especially if you have many pages and ad accounts.
The groups can be established and discovered on the company manager’s dashboard by clicking on “Business Assets Groups.”
Set up a location
Setting up a location is not required, however, it may be highly useful if you want to have custom audiences based on your business’s location.
To add a location, go to the dashboard’s “Business Manager” section and choose “Shop locations.” As an additional marketing effort, you may create a product catalog in the same place that is labeled “Assets.”
How to delete a Facebook Business Manager?
If you determine that this tool isn’t right for your company, you may uninstall it.
Simply navigate to the settings tab in your Facebook Business Manager and select “Business Info.” If you wish the manager to be removed, you may select the “Permanently Delete Business” option on the right side of the page.
While we recommend that all the company owners check out this tool, we recognize that there are several ways to advertise your brand and earn money on Facebook. This is why having a Facebook Manager is great, but not the only way you can be successful.
Final Thoughts
Facebook Business Manager has produced great results since it provides split testing, conversion lift, and a brand lift, all of which will enhance your company’s sales and revenue. Smaller companies could manage all the assets without this tool, but if you want to grow your team or number of clients, you need to get familiar with all the terms about Facebook Marketing.
It’s simple to set up, and the platform allows company owners to personalize the experience by adding pages, people, and advertisements. This is why tools like this one are so adaptable and allow you to maximize the growth of your Facebook account.
Having all of your choices for steering your company in the correct direction in one location will save you money and enhance your chances of success in the long term.

- How to Create a Winning Social Media Strategy for Your Business? - October 12, 2023
- Elevate Your Online Presence: Tips for Better Social Media Use - October 12, 2023
- The Ultimate List of Top Social Media Apps and Sites - October 12, 2023